Removing the Specialty Dry Ink in Stations 1 or 6
 CAUTION: Before you perform this procedure, ensure that the press is powered off.CAUTION: When you perform this procedure, wear protective gloves. Failure to use gloves can result in image quality issues related to the Drum Module.CAUTION: The drums are highly light-sensitive. Ensure that the drums are protected from light.CAUTION: Do not remove any parts or assemblies, attempt any steps, or use the Xerox-provided Torx driver other than described in this procedure. If the customer performs a prohibited procedure, the customer waives all claims that arise from doing so and Xerox disclaims any liability. The prohibited removal of parts or assemblies and prohibited use of the Torx driver is included.
Note:The entire procedure to remove and replace the dry ink/toner in Stations 1 or 6 requires two carts. For the removal procedure, position an empty storage cart close to the press. Place any screws removed during the procedure in the cart tool bin.
1. Power off the press.
2. Open the left, front doors of the press.
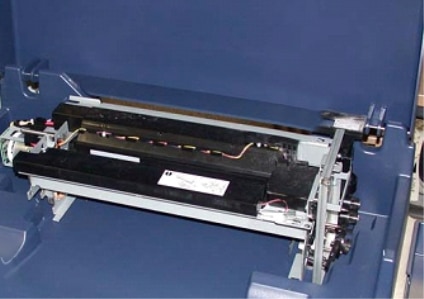
3. Remove the Xerographic Marking Module Cover (1) and the IBT Front Cover (2):
a. Loosen the three upper screws and the three lower screws of the Xerographic Marking Module Cover. Remove the Module Cover (1).
b. Loosen the four screws of the IBT Front Cover. Remove the Front Cover (2).

1 Xerographic Marking Module Cover
2 IBT Front Cover
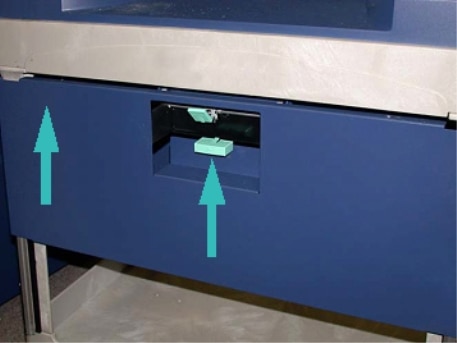
4. Unlatch the Paper Path Module by setting the green Locking Handle 3 to the Unlock position.
5. Unlatch the Transfer Drawer by rotating the Restraining Latch (A) clockwise and pulling down on the Latch Bar (B).
6. Before performing this step, use the black light shield curtain. If you change the dry ink/toner in Station 6, remove the two screws on the Flywheel, then remove the Flywheel.

7. Place the screws and the Flywheel in the storage cart bin.

8. Position the empty storage cart in front of Station 1 or 6. To catch excess dry ink/toner, extend the tray, then raise the top cover of the cart.
 CAUTION: In the following step, when you push down to engage the Foot Brake, use caution.
9. To prevent the cart from moving, press down on the cart Foot Brake.
10. Open the top, left dry ink door of the press. From the top left compartment, retrieve the Corotron Assist Tool.

11. On the Xerographic Marking Module faceplate, push the Corotron Assist tool onto the two pins.

12. To unlatch and release the Charge Corotron, press down on the tab and pull the corotron out of the press.

13. Place the Charge Corotron with the Corotron Assist Tool on the storage cart.
 CAUTION: To prevent damage to the Drum and to prevent the Drum from turning, hold the knob assembly when loosening the lower screw.
14. There are three Xerographic Marking Module screws. Loosen the two screws at the top and, while holding the Knob Assembly, loosen the lower screw inside the knob assembly.

15. To disengage the Front Drum Guide from the Drum Cartridge, pull the Guide toward the front of the press and rotate it counterclockwise.

16. Slide out the marking module to the service position. Rotate the Drum Cartridge Retaining Latch clockwise and pull it toward the front of the press.

17. From the top left compartment behind the dry ink door, locate and retrieve the protective, black bag.
CAUTION: To prevent light shock to the Drum Cartridge, do not expose the Drum Cartridge to light for longer than one minute. Immediately after you remove the Drum Cartridge, place the cartridge in the protective bag.CAUTION: Do not slide the Xerographic Marking Module out of the press until you are fully ready to remove the Drum Cartridge.18. Grab the handle and pull the Xerographic Marking Module out to the Service position.
19. To remove the Drum Cartridge, stand at the side of the Xerographic Marking Module. Move the Drum Cartridge toward the front of the Xerographic Module, then up and out the side of the Module.

20. Immediately place the Drum in the protective, black bag. To prevent damage to the Drum Cartridge, place the flat side of the Drum facing down on the storage cart.

21. Remove the shoulder screw on each of the Xerographic Marking Module rails. Place the screws in the tool bin of the storage cart.
 CAUTION: When lifting the Xerographic Marking Module, do not lift using the Locating Pin.
 CAUTION: Due to the height and weight of the Module, use a step stool to perform the following procedure.
22. Place the step stool in front of the cart and press.

23. While pushing down on the rail latch, lift the front of the assembly, and slide it forward.

 CAUTION: The Developer Housing weighs approximately 4.5 kg (10 lbs.).
24. Use both hands to lift and remove the Xerographic Marking Module. Place it on the storage cart.
25. At the press, on the side of each rail, release the Xerographic Marking Module rail tab, then push the rails completely into the press.

26. Remove the existing dry ink/toner cartridge from Station 1 or 6 by grasping the end of the cartridge and pulling straight out of the press.

27. Place the cartridge on the storage cart.

28. Loosen the screw on the Auger Assembly, and remove the two screws on the frame that secure the Dispenser Assembly. Place the screws in the tool bin of the storage cart.
 CAUTION: For the following step, when the Bottom Door Latch of the cart releases, the door drops suddenly. Hold the door handle and slide the door down into position.
29. At the cart, hold the door handle, release the door latch, and slide the door down into position.
 CAUTION: Before placing the Dispenser Assembly on the cart, raise and lock the Auger Assembly.
30. As you begin to pull the Dispenser Assembly out of the press, rotate the Auger Assembly up until it is latched in position. Keep the front of the Auger Assembly up and raise the black latch to lock it into place.

31. With both hands, remove the Dispenser Assembly and place the assembly on the storage cart.

32. Lift on the door handle and slide the door into position until the latch engages.
 CAUTION: When you release the Foot Brake, use caution.
33. To release the Foot Brake, hold the storage cart and carefully push down the Foot Brake.

34. Push in the tray and close the top of the storage cart.
35. Move the storage cart to a safe area.
36. From the storage cart with the dry ink station you removed, transfer over the components on this storage cart to the other storage cart with the unused dry ink station.